source: www.youthwork-practice.com | 2000 Games, Devotions, Themes, Ideas and more for Youth Work
only for private using
Simple Craft Ideas for the Indian Adventure Camp

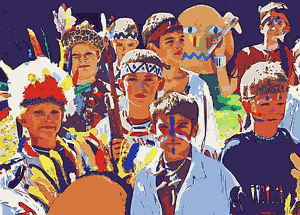
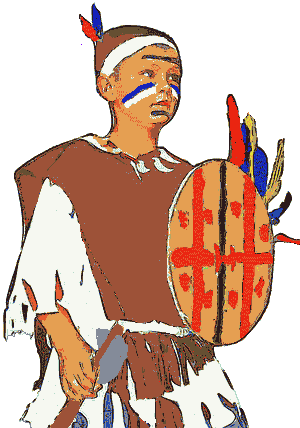
The craft ideas which are described here are not true to the original, not even close. The craft ideas should be quick and simple to make so that the children see a quick "success" result. A scalp shirt is cut to shape in 5 minutes; a simple cardboard headband with feather in it takes 10 minutes. When war paint is painted on the kids faces, the thing is almost perfect, especially for smaller children. With a little more time invested and a little more skill, all of the ideas can be more refined and nicer looking. It is recommended that you make an example of the craft idea before the camp begins, for the others to copy. These encourage and spur the children on if they see how the end result could turn out.
-
Indian skirt or scalp shirt with scalps
A scalp-shirt or an Indian skirt can be made from a potato sack or an over-long t-shirt. Approx. 10cm long fringes are cut into the bottom of the t-shirt as well as around the sleeves. A leather belt, a fabric Wampum belt or a piece of cord works as a belt. A scalp and be represented by 5-6 messed up pieces of wool which is sewn/glued onto the scalp shirt with a bead. A few Red Indian motives and pictures can be painted onto the shirt with fabric paints or sewn on.
-
Simple Indian shirt
If you do not want to sew or cannot sew, here is a simple guide for you. You will need some material as wide as your back and double as long as the distance of the shoulder to the knee. A slit is cut directly in the middle so that your head can fit through. A cord, a belt or a long piece of material as a Wampum (stomach belt) is then tied around your waist over the Indian shirt. The Indian shirt (hunter's shirt/ scalp shirt) can be decorated with motives (e.g. triangles, rhombuses, stripes, waves), the tribe's symbol, (e.g. buffalo or eagle) can be painted on, or you can apply a fringe to the edges (see description). Fringes can also be cut into the material. You can wear a loincloth under your Indian shirt (see following description) which is held in place with a simple cord tie.
-
Loincloth
A loincloth is made from a front piece and a back piece. Suitable materials are single coloured left –over pieces of fabric, hemp sacks etc. Both halves should be approx. 20-30 cm wide (depending on the width of the hips) and approx. 40 cm long. At the top, the material is turned over and sewn down so that a belt or cord will fit through later.
-
Headband with feather
A headband can be cut from a 3-4cm leather band, but also from a sturdy piece of cardboard. You can, of course, also use a long piece of ripped material for the headband. The band can be decorated with potato stamps, leather motives or painted motives. An elastic provides the link between the two ends.
-
Wampum

A strip of thicker material (old sheet, one coloured curtain fabric) is tied around the waist (paunch) and used as a knotted belt. This is the easiest solution. Lengths of wool can also be braided into a nice piece of cord, which can also be used as a belt. If you have lots of time, you can even weave a nice wampum with the help of a weaving frame. A Wampum was something special and was often used to pay for items or as a special present.
-
Spear, Tomahawk
A spear point or hatchet is sawn out of a piece of plywood and attached to a brush handle or willow stick with a slit and some string or straw. With 2-3 feathers, carvings or painted on motives, the axe or spear can be nicely decorated. .
-
Shield
A 40cm large circle is sawn out of a piece of plywood and a piece of material of leather is stretched across it or is simply painted with motives and decorated with feathers and „wool scalps“. 2 leather bands which are attached to the shield through 2 holes are used for the grip. If you do not have any plywood, you can also use strong cardboard. That is a lot quicker and is a lot easier for younger children to work with.
-
Amulet and necklaces
There are many possibilities and variations. Round plywood plates which are painted and varnished, round stones with a hole, sprayed with gold alongside lacquered round sections, pearls, natural materials (pieces of cork, chestnuts, acorns, beechnut), bear claws or tiger teeth can be sawn from plywood and threaded onto a leather band together with a few wood beads. Straws can be cut into little loops of 2-5 cm and can also be used. Detailed notes: Examples of necklaces.
-
Totem
A totem pole can be carved out of plaster. The wet plaster is poured into an empty shoe box, milk carton or even a plastic bag and when the plaster is half dried, you can carve a figure (or similar) into it. To conclude, the totem pole is painted. If each group has at least one totem pole, you can play brilliant Indian games with them.
-
Peace pipe
A piece of wood, a small cardboard roll or a cork is attached to a long stick (round wood or carved willow stick). The peace pipe is then painted accordingly and decorated with little feathers. The pipe can be hung around the neck with a band.
-
Leather bag
For this item you will need a piece of material or fur approx. 75x 20 cm. 4/5 of the material is laid over itself and sewn down the sides. The rest of the material is folded over as a flap (similar to a school satchel). A leather cord can be used to close the bag. To carry the bag you can either use a leather band or simply cut two slits into the back and slip your belt through. To conclude you can decorate the bag with a few designs, a few pearl beads, scalps or feathers.
-
Medicine pouch
A circle with a diameter of 20cm is drawn onto a piece of leather and is cut out. At a distance of approx. 5-10mm from the edge, little holes are punched into the leather circle using punch pliers all the way around approx 3-4 cm apart. A leather lace is threaded through the holes. The simple medicine pouch is finished. You can also decorate the leather pouch with little decorative touches.
-
Medicine man mask
A mask is shaped using papier maché and paste. Do not forget two eye holes and two holes for the elastic. Once the mask is dry, it can be painted. Straggly shaggy hair is made from an old mop or by using lots of long pieces of black or white wool. The hair can simply be stuck onto the mask.
-
Wanabajah
This is a musical instrument which was mainly used by medicine men. Take approx. 6-8 walnuts and try to open them cleanly with a knife so that the shells do not break. (This works better if they are soaked in water for 1-2 hours). The insides of the walnut are removed and if required, small beads placed inside. An approx. 6cm long thread is glued inside and the two walnut halves are stuck together. The end of the thread is tied to the top of a stick (approx. 20-30 cm) with a wooden ball (diameter approx. 5-6 cm). If you do not have any wooden balls, you can also use a cube-like four-sided piece of wood which has an edge length of 5-6 cm. In order to fix the thread, small holes are drilled into the wood. The thread is pushed into the hole with a matchstick and this matchstick is then glued in place. The Wanabajah is ready.
-
Indian rattle
Several layers of transparent paper are stuck onto a light bulb. Once dried, the now thick layer of paper and the light bulb are carefully broken into pieces. The pieces now make up a puzzle.
-
Bow and arrow
For safety reasons we have not included the bow and arrow on our camp with approx. 60 kids. We also want to rid the forest of wood. We have incorporated this on camps with less group members, with older members and in other local conditions. Wicker with a diameter of approx. 15 mm is suitable – depending on the length of the bow. Small slits are carved into the bow at both ends. A 2mm wide piece of plastic string (nylon package string) is now stretched over the bow. The bow and arrow can be decorated with feathers if desired. Corks are suitable for use as arrow points and can be fixed in place with sticky tape. Despite warnings against not firing in the direction of other people and not at the tents, you must reckon with this. Therefore the members of staff must be extra vigilant and ensure that the rules are followed. If someone does not follow the rules, they must give up their bow and arrow or spear.
-
Arrow quiver
Cardboard rolls from carpet stores or cardboard rolls which are used for posters are suitable for making a quiver. If you do not have a cardboard roll or any cardboard, you can also use leather or material cut to shape. A band or leather strap can be used as a carrying strap. The quiver can be painted and decorated with leather fringes or material. Old chamois leather is suitable for the fringing. The car or window leather should be cut into 10cm wide strips which are 8-9 cm long. These fringe strips can now be glued or sewn onto the quiver.
-
Indian drum
Material:
1 empty Pringles tube, some strong wool, sticky strips (sellotape etc), some colored paper, felt-tip pens for coloring, feathers, wooden beads and 1 sheet of copy paper
Description:
You take the empty Pringles tin and stick 1 white A4 sheet of paper to the can (from just underneath the rim) wrap it around once and stick the end using sticky strips. Stick an approx. 5cm brightly colored piece of card to the bottom of the tube. Now you can decorate the tube with Indian patterns using markers or felt tip pens. Next take the wool und cut off several pieces – at least 1metre in length. Knot the pieces of wool together at the top and make a plait. This decorative plait should then be first wrapped around the top end of the tin once, tied together and then wrapped around again. Keep at least 10-15cm free at the end of the plait. At the bottom end, attach a brightly colored feather and a wooden bead. Place the lid back on the tin and you are ready to start drumming! I led this activity at our camping trip and it went down well. First we obliterated the insides of the tin and then sitting around the campfire, made plenty of noise on our drums – simply great!
Author: Conny Fleischmann
[ © www.youthwork-practice.com | 2000 Games and Ideas for Youth Work ]


